

NOV8TR
-
Posts
217 -
Joined
-
Last visited
Everything posted by NOV8TR
-
I thought I'd give this post a little "bump" to see if interest in 3D printed geocaching stuff had picked up since this last post. I've been 3D printing for a while now (at my place of employment), and have done some little projects for myself (geocaching of course) just to test a 3D printing concept (threads for attaching 2 things together, how much can I "overhang" a ledge with out support material, layering strength, ect). If someone shows an interest I'll post some pics, or answer questions. By the way, I'm running (2) Makerbot replicator 2X machines (yep, that's right,,, 2 of them,,,, lots of things need to run over night). phone and GPS mount Selfie Stick on Trecking Pole
-
For what it is worth, you can follow this link to a web page that describes how I use my Tomtom for "paperless" caching. I do have a dedicated hand held that goes with me into the field, but the Tomtom screen is much friendlier on my old eyes for reading the cache page while still in the car. I did take my Tomtom into the field when I first started geocaching, but field damage and limited battery life forced me into some pretty serious fixes and tweaks.
-
Heavy Duty (offroad) GPS Mount
NOV8TR replied to Team_FussyPants's topic in GPS technology and devices
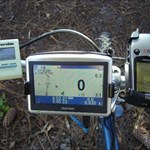
I made my own mounts (from RAM base units). Though the RAM attachment devices are pretty rugged, I tend to "push the limit" off road and my equipment pays the price (so has my body). Here is my Tomtom and Garmin Vista mounted to my Dual Sport (Honda XR650L) Vibration was a serious issue, so I came up with this interface plate. It is made from .09" thick aluminum (5052), and surgical tubing. I used Dow Corning #732 silicone sealant to bond the surgical tubing to the aluminum. I stress tested this setup to failure in the lab before I made two more for vehicle installation (Motorcycle and mountain bike). I loaded the fixture in the shear axis, and the tension (pull) axis with 50 pounds (static load). It finally let loose somewhere in excess of 75 pounds in the shear axis, probably due more to the "peal" condition of the bond than the strength of the material itself. The hole pattern on all the ram mounts (Tomtom and Garmin) are identical, so I did not have to design two different configurations. Here is the setup on the mountain bike. I did not need to vibration mount the GPS in my 4X4, but I did rip off the dash and mount directly to the steel cage that attached to the firewall. Super sturdy! I have adapters that permit me to interchange any of my GPS devices (yes, I have more than one) and my cell phone for hands free operation. -
My walking stick serves double duty as a “web whacker”. So far though, I have not been keen eyed enough to eliminate all the “web in the face” flailing about and hopping from foot to foot trying to escape imaginary bugs. I don’t like spiders that I don’t see first! I also wear last season’s “moto gloves” (thick leather palms with thinner leather fingers and plastic knuckle armor) when Geocaching. I buy a new pair every year for my motorcycle, so the “retired” pair are like getting freebie Geocaching gear! There is just something about sticking my unprotected hands into dark places (the unknown) that bothers me. With so many magnetic nanos stuck to the bottom or back side of guardrails and electrical boxes, I consider gloves a fundamental part of my Geocaching gear. They are also good prevention from getting poison oak. If I know I’ve been exposed to it, the gloves go in the wash with all my other contaminated gear.
-
Replacing a screen cover on the Garmin Etrex Vista "C"
NOV8TR replied to NOV8TR's topic in GPS technology and devices
Moderator; This is intended to be an informational post, really nothing more that a "handy link". Please feel free to close this thread to keep the thread length to a minimum. Thank you -
Replacing a screen cover on the Garmin Etrex Vista "C"
NOV8TR replied to NOV8TR's topic in GPS technology and devices
Continued from previous post I had a need for more than 1 replacement screen cover (my Vista HCx has some deep scratches on the screen cover too), so I set up the fabrication fixtures to bang out 6 parts in 2 steps. I made 3 finished parts and left the remaining 3 parts just roughed out for future “opportunities”. A fine tooth hack saw (24 teeth per inch) made quick work of the rough cuts, and the final shape was done with a belt sander using 80 grit paper. It took about 20 minutes per part to get the final shape. I did not want to remove too much material and waste a part, plus I also did not want to heat the acrylic too much and deform the part. It could be done more quickly, but my eyes are getting old and my hands are not as steady as they once were. Each finished part had to be custom fitted into the front case because I could not belt sand to a line as accurately as I needed to, so I worked each part down one at a time and then moved on to the next. You will need to prep the recess on the front case before bonding the screen cover in place. The OEM screen cover is painted black on the backside around the edges, and the Garmin name and model designator are stenciled to the plastic for cosmetic purposes. I choose not to paint the screen cover (which I now regret), but I did blacken the recess in the case so it would not look quite so bad. The next time around I will paint the back of the screen cover because it will look even better then what I wound up with this time. This is the stuff that I used to bond the new screen cover in place. It can be picked up at most “big box” do it yourself outlets (Home Depot, OSH, Harbor Freight, ect..). It is an RTV sealant but this particular concoction (#732) is an outstanding all weather adhesive. I use it in our optics lab at work to bond 16” diameter 4”thick glass parabolic mirrors (which weigh in excess of 80 pounds) to their adjustable alignment mounts. These units then get shipped all over the world, and never come loose. I find that in small assembly situations (like this project), using a 3 ml syringe with a blunt tip is an excellent way to apply this stuff in a very controlled manor (the tapered tip that comes with the tube works too, just not as elegant). Apply a thin bead right down into the corner of the front housing all the way around. Don’t use too much, or it will mush out when you press the screen cover in place. If it gets onto the display, it will ruin your day! Once the screen cover is in place, let the RTV cure for at least 4~6 hours before handling it. Once that is done, you can reverse the dis-assembly process (but, don’t forget to remove any fingerprints from the inside of the new screen cover!). Reassembly is very straight forward, so I’ll not elaborate further on that process. I re-used the vinyl strip that goes under the rubber bumper, but I did not bother with all the gooey tape that was underneath it. The vinyl tape was still sticky enough to do a good job of holding the front half and the back half of the cases together, so I saw no need to complicate the assembly. I then ran beads of the same RTV 732 sealant all the way around the case and criss-crossed a few beads at appropriate locations (making sure the buttons were not affected). In this application I was not worried about the RVT mashing out from the edges because it is pretty easy to wipe off, and I wanted to be sure there was a good (reasonably good) water tight seal around all the seams. After wiping off any residual RTV from the edges, I wrapped the whole thing up with rubber bands to make sure that the rubber bumper cured to the case in a “form fitting” fashion. Let this configuration set for a good 12 hours before removing the rubber bands. And the finished project……. Sitting beside a future victim of the screen replacement project. Full photo gallery for this project can be found under the user name "Etrex Vista C" Link to profile -
Garmin Etrex Vista "C" Garmin Etrex Vista C dis-assembly and replacement of screen cover The rubber bumper that surrounds the outer case had already fallen off of this unit by the time I got my hands on it (typical for the whole Etrex series). So the first step in this repair was to remove the “gummy goo” that was intended to hold that rubber piece in place. Both the Etrex housing and the rubber strap need to be cleaned very well before attempting to glue everything back together. I have found that kerosene does an excellent job of removing the goo, and requires little to no scrubbing. I use BBQ starter fluid because it is easy to buy and store. I don’t own a BBQ anymore, but I always keep this stuff around because it is an excellent degreaser, and cleans up with soap and water easily. After cleaning up the “Garmin Goo”, you will find a semi-clear vinyl covering that serves as a “sticky back” base for the exterior rubber covering to be glued to. It can be cut with a razor blade (preferably not near the buttons if you intend to re-use it), and carefully removed. I did not have an extra one on hand for this repair, so I removed and cleaned the old one. Under this vinyl strip you will find 2 layers of clear tape which provide the “water proof” factory seal. Remove all the tape and pitch the scraps. You will need to de-gunk the surface of the unit again so you do not contaminate the interior with dirty hands and sticky bits of goo. Once the exterior is clean, you can start releasing the snap latches located on the seam of the front and rear housing. There are 2 on each side and 1 on the bottom near the lanyard loop. It is best if you work on a soft clean surface during this phase because when the unit pops open, it happens pretty fast and you will tend to have pieces getting away from you. I found that using 2 small screwdrivers worked pretty well, but you only need 1 to pop the snap latches if you keep pressure on the case to keep it from re-latching as you move on to the next one. When you get the case apart, this is what you will find. Take note of the contacts on the rear housing that connect the serial port to the PC Board. These should be cleaned before you put things back together. The contacts that connect the battery terminals to the PC Board should also be cleaned. I like using a pencil eraser to do this, but I’m sure there are better ways. Some people swear by contact cleaner, but I’m too cheap to invest in yet another chemical to store in my garage, and the eraser method will remove some of the corrosion that electrical contact cleaners will not. As long as you Clean these contacts and the corresponding tabs on the PC Board, you will have done yourself a service (one of those “ounce of prevention” kind of things). Be careful not to disturb any of the foil that covers the sensitive electronics. This is just EMI/RF shielding, and can take a little bit of handling, but better safe than sorry, so don’t mess with it if you don’t have to. This is also a good time to check around for cracks and loose parts. Hopefully this will be the last time you have your unit open, so take a good look around for potential problems. In order to get the PC Board out of the front housing, you must remove 1 screw. It can be found in the pictures below. Good luck finding the “official” tool used to extract this screw. I have a set of drivers for these type of screws, but this one is significantly smaller than anything in my tool box. Fortunately, if you have a set of jewelers screwdrivers, you will discover that one of the smaller ones will fit perfectly across the 6 pointed star feature on the screw head. This screw is screwed into plastic, and is the self tapping type, so it will take some force to remove. DON’T SLIP !! I found that a small pair of needle nose vise grips attached to the handle of my jewelers driver gave me enough leverage and control to do the job safely. It was like using a “T” handled driver and worked very well. If you are going to mess up your unit, this is probably when it is going to happen! Plan it out and go slow. Once the screw is removed, you will have to “pry” out the PC Board. I used gentle pressure, mostly working around the top and upper sides of the unit, avoiding the screen area as much as possible. It does take a bit of working back and forth to get out. I think that is mostly due to the snug fit of the click stick boot to the housing and the click stick shaft. As you can see, in my case the boot came off with the PC Board rather than sticking to the housing as one might expect. All that has been done thus far is the easy part! Now you have to get the damaged screen out. The screen is attached to the housing with a spongy double backed tape. This is the toughest stuff I have come across in the tape category. I’ve used similar products, but nothing that had the adhesive qualities that this stuff has. I found the only way to remove the screen cover (without breaking if further), was to use my finger to put pressure on the screen cover from the inside, and then use the smallest flat tipped jewelers driver I had to “poke holes” in the spongy tape. I worked my way around the periphery twice before the assembly finally let go. This was a major PITA, but the 20 minutes of work was worth it, because with the screen cover intact I now had a perfect template for the fabrication of the replacement screen cover. Shown below is a piece of acrylic that I purchased online from “Onlinemetals.com” Here is the link . I picked acrylic over lexan because acrylic is more transparent, and it is less flexible. The display sits very close to the back of the screen cover, and I wanted to be sure that a flexible display would not get pushed back and contact the display (storage in a back pack can be tough!). Lexan will probably work just fine, but I wasn’t willing to take any chances. See next post
-
Link until I figure out a better way to post in this forum
-
After being entertained for the last 3 days reading a recent thread involving a failed Geocide, I just could not keep myself from posting this. I am not a troll (yet), and I rarely post for social purposes (this may be my first!). However, that thread got 266 replies, was viewed 5,758 times the last time I checked, and it only survived for 3 days! Amazing! I wish people had as much interest in, and devoted as much thought to voting for their government representatives! What a better country (read “world” for those of you can’t vote for one reason or another) we could have by exercising the same sort of banter over topics that really matter, rather than over a silly game that has almost no rules, and only “volunteer cops” to enforce them! Ok, enough of all that “grownup” kind of talk, and on to something to incite passionate replies and thought provoking pontification by many persons far more insightful and witty than myself. I AM NOT QUITING GEOCACHING !!!!! 1. I like playing a game that I can play however, and whenever I want. 2. I don’t mind urban nanos. On some days, a P&G power trail is as comforting as a “saw nobody all day long” hike for a single smiley. 3. I like doing something that has little to no impact on anyone other than me. 4. I am grateful there is an organization out there that makes this all possible (I will gladly continue to cough up the $30 p/year fee). 5. I am encouraged that there are still enough people out there willing to volunteer their time to keep this thing going. (Thank you all very much!) And if that isn't enough, I think the world ain’t such a bad place after all! So,,,, come on,,, somebody just try and make me want to quit! I’m serious! If you don’t, I might just go out and plant an ammo can full of McToys in the bushes! Edit for typo
-
Please elaborate! I've been creating GPX files from pocket Q's and then loading into Earth,,,, there is an easier way?
-
Yep, I'm on board with the "ban the banner" crowd. And a thousand thanks to Schnueffler for the "Add Block" tip! Now the banner has been banned
-
did you hide one within eyesight of your house or work?
NOV8TR replied to ashnikes's topic in General geocaching topics
I have one called ICU that I can see from my desk at work. I have never seen anyone searching for it, but if I weren't to darn busy to look out my window (very scenic view to the North) from time to time I would certainly be able to see you! -
It really isn't all that hard! "deb3day" hit the nail on the head when she described memorizing the last 3 digits of the lon/lat, and walking around until the numbers match. You should switch from the "Nav" or "browse map" (depending on how you are using your unit) to the satellite setup screen. The satellite setup screen always displays real time (and not "road locked") coordinates. Even though I have moved on to one of those nav units that have all the fancy geocaching whistles and bells, I still use this method if the cache placement isn't obvious when I am approaching ground zero. Practice, practice, practice. Have fun!
-
Broken Garmin Vista HCx - Need help
NOV8TR replied to alazovic's topic in GPS technology and devices
alazovic, Great idea regarding the "exhibit only" floor model! I wish we had a big outlet store, or retailer in the town I live in (Santa Barbara), so I could just go pick one up. I have E-mailed R.E.I. and Garmin requesting an "exhibit only" unit, but I'm not getting my hopes up. However, thanks for the excellent clue on solving my problem! When I find that elusive "exhibit only" unit, I'll rip into my beloved Etrex Vista HCx and post the info you are looking for. Thanks! -
Have you modified your vehicle for geocaching?
NOV8TR replied to bittsen's topic in General geocaching topics
I added this strap to my F150 4X4 bench seat to keep my Geocaching backpack handy between trails and for the quick P&G’s. The pack stays put, and the phone camera and GPS are all easy to grab. Yes, the strap hooks to the child seat anchor, so it is nice and sturdy. And naturally one must have 2 GPS's in the car gor Geocaching,, right? -
Broken Garmin Vista HCx - Need help
NOV8TR replied to alazovic's topic in GPS technology and devices
alazovic, I have been planning to open up my Vista HCx as soon as I can find someone to sell me a replacement screen cover ( mine is pretty scratched up). Unfortunately, Garmin will not sell parts for repair. What I have found on Ebay is questionable, and I’m not sure what other models in the Etrex line are direct replacements (at least the screen cover), and therefore might be used as parts donors. If you can tell me where to get the screen cover (it looks like you need to find one too!), I’ll open up my unit and have one of our engineers (aerospace industry) document that section of the board in question. He has done this for me before on another brand of GPS, and even fixed the broken parts (it still works great!). I just need to find a place to get a replacement screen cover to get the ball rolling on this project. So, do you have a source for Garmin parts (at least the screen cover)? -
Holding an eTrex Vista HCx with my hands reduces signal?
NOV8TR replied to nfh's topic in GPS technology and devices
I have found that the Etrex HCx likes to be held face up and at a "bent arms length" from the torso for accurate readings. Also, Garmins default logging routines are pretty good for "general purpose" tracking, but for the best results I have found that setting the tracking log to 1 or 2 seconds (time) rather than distance or heading gives much more accurate results for tracks that are less than a few hours long. Like "lee_rimar", I also purchased a Forerunner (I got the 305) for running, biking, and hiking. It is much better suited for "turn it on and forget about it" operations. It seems to be less particular about antenna orientation, and it has the SirF chipset which I like much better that the Mediatek chipset found in the Etrex HCx. I almost always use them together and compare tracks after an adventure. When I hike, I wear the Etrex on the top of my back pack's shoulder strap which points the antenna at the sky (for the most part), and the only obstruction that blocks it's view of the satellite constellation is my big fat head. Even so, I still think the tracks laied down by the Forerunner are smoother and are for the most part more repeatable than those laid down by the Etrex. I love my Etrex, and would buy another in a heart beat if I lost the one I have now. However, I would also say the same thing about my Forerunner 305, and my Tomtom One Xl. Each has a task that it does best, and each has a week link that the other unit fills in perfectly for. For now I would suggest you set the track log to record once every second (roughly the same cadence of your run), which should take the arm swing out of the equation, and check your results again. You may find that the results are within acceptable tolerances for measuring the distance of your run. Oh yeah, don't trust the trip meter for distance measurement (very inaccurate), and don't save your track! Load it as an "active log" directly into Mapsource and then save it there. Saving a track on the unit can seriously degrade the track accuracy if it has too many points (some sort of rounding routine is used to save memory space). -
This game has so few rules, it invites opinions like bears to honey. It is reasonable to assume there are as many types of C.O.'s as there are hunters of caches. Some C.O.'s take great pride in the difficulty of their hides. The craftsmanship and creativity they invest in a hide is sometimes nothing short of astounding. Those C.O.'s tend to develop a reputation, and attract geocachers from great distances to hunt for their more famous caches. A spoiler pic is a rare thing for those guys. Other C.O.'s are perfectly happy to toss an old piece of Tupperware (or worse) in a roadside ditch and call it a good days work towards improving their "Caching karma" (rarely a spoiler pic, but for an obviously different reason). Many C.O.'s do a good amount of research about the chosen location and try to pass on a bit of an education to the hunters of their cache. Their spoiler pics are most often of a historical marker (which the cache container is attached to, or very near). Some of us C.O.'s (I'm in this bunch) just want an excuse to get outside, and desire to entice as many others to get outdoors as we can. I personally include a "give away" spoiler on all of my caches. I want my caches to be found, and I want anyone who makes the effort to get to the site to walk away with a "smiley face", even if that boils down to nothing more than a goofy icon on a stats page. I don't want people tearing up the foliage or taking apart plumbing fixtures, or digging through piles of sticks or rocks to find my hides. If you made it to my cache site, I have done what I set out to do. It takes all types to make this game what it is. We would soon become bored with this game if everyone hid their caches like I do, and we (at least I) would become discouraged if we only found 1 out of 10 or 20 caches we hunted for. Spoiler pics are just another kind of hint. Some like them, and some don't. I prefer to give the geocacher looking for my hides a choice. They can look at the spoiler pic if they want, or they can ignore it. They can read the hint if they want, or they can ignore it. A game with few rules is all about choices, both for the "hiders" and the "finders". If you enjoy hiding things for others to find, as much as you enjoy finding things others have hidden, then you are doing it right! Is this an awesome game or what? Have fun!
-
I log every visit to a cache, and here is why: As a cache owner I want to know if my cache needs a visit from me for maintenance, or a terrain/difficulty rating change (fires, rain, land slides, tree falls, vegetation overgrowth, and trail rerouting are all reasons for changing the ratings, or temp archiving a cache). Also, some cache owners (myself included) are more interested in getting people out to a spot than "claiming territory". If I have a cache that has been visited by all the "usual suspects", but hasn't seen any traffic for a while, I'm more likely to pull the cache and give someone else an opportunity to place a hide in that location (nothing like a chance for an FTF to get the local folks out in the woods!). There is no way to get feedback on stuff like that without logs. On the flip side of the coin, I don't like being out in the field and needing to look at "the last 5 logs", only to discover 5 DNF's logged by the same person (or team of people). So out of respect for the other "paperless" cachers, I edit my first DNF log so it includes all the relevant information for each attempt at the cache (including the dates). I find that cache owners who like to place really hard hides are more likely to give helpful hints if they see I have tried several times to work out their challenge, but keep coming up short. This way the paperless crowd is happy, the cache owner is happy, and I feel like I have done my "due diligence" in keeping the game moving along. Remember, ALL of your logs are a big part of the game. Your DNF logs are more important (or at least equally as important) to the other players and the cache owner than they may be to you. The first step in the game is getting to a predetermined location. If you do that, log it!
-
Looks like the PQ Hamsters have been feed and watered. My PQ's are collecting logs again,, yippeee! Now if I could just get the "My Finds" Zeroed out, I'd be a happy camper. One thing at a time.
-
Looks like I'm on "the list" too! I even created a new PQ just to see if some old setting was causing the problem,,, but alas,, still no log data. The "my finds" QP does not register my latest finds either, so I guess I'll have to wait SEVEN WHOLE DAYS before I know if that gets fixed !
-
What model Etrex? Software version? Firmware version? Have you checked out any of the threads here on the "drift" issue on the newer Mediatek chipsets that are in the Etrex series (at least the ones made in the last few years).
-
REF: Garmin Etrex Vista HCx Well, after a few months without trail hiking (doctors orders), I have had to “down grade” my chipset back to version 2.5 firmware, and software version 2.4 due to that pesky “drift” that popped up with every firmware/software combination from 2.6 through the latest release (effecting only the MTK “Bravo” chipsets). Since November/December, I had been running 2.9 firmware (chipset) and 3.2 software (the user interface stuff). That combo seemed to work fine here in the urban areas of Santa Barbara where we have no tall buildings, and enjoy a South facing coastline (unobstructed view of a WAAS bird at all times). I thought the “drift gremlin” had finally been whipped by the Garmin software engineers. Today I finally “broke the rules” and hit the trails for about a 5-hour hike to do some maintenance on a string of caches I own. This particular trail starts on a hill top and then drops into a canyon for about a mile, and then it climbs up to follow a ridge line deep into the foothills. The trail winds back and forth from one side of the ridgeline to the other for a few miles playing “peek a boo” with that southern WAAS bird every 10~25 minutes. On this particular outing, I had 2 GPSr’s on, and laying down tracks. I had my Etrex Vista HCx (the “drifter”), and I had my latest toy, which is a Forerunner 305. The Forerunner has the SIRF chipset, which is rock solid (I was primarily using it to monitor my heart rate, and record my step cadence, in addition to laying down a track). I have tested the SIRF chipset in my Tomtom against the Garmin Vista (MTK chipset) many times. I have also had the opportunity recently to have all three systems up and running at the same time (I bought the Forerunner just before Christmas, so I have had plenty of time to “characterize” its accuracy). I can say with a very high degree of confidence that the SIRF setups (Garmin Forerunner and Tomtom ONE XL) are much more stable and repeatable than the MTK chipset in my Garmin Vista HCx. Today, the Vista did very well all the way out, and most of the way back. However, once I dropped back into that deep canyon on the way back (about 4 hours into the hike), the Etrex Vista started wandering and never came back. By the time I got back to the truck, it had “drifted” off by some 200 feet to the East. I was not really watching it when it happened (I knew where I was, and I was not looking for a cache), but when I got home and overlaid the tracks in Mapsource it was obvious. The outgoing tracks were in lock step with each other (never more than 20~30 foot separation), but coming back (after dropping into the canyon) the Vista just started wandering off on its own, while the Forerunner stayed right on top of the outbound track it (and the Vista) had laid earlier in the day. This is exactly the same sort of conditions that generated the “drift” before. The unit had been on for more than an hour, and the available constellation of satellites was limited for short periods of time. The unit just never comes back to the correct position even when located in “perfect” conditions unless it is “power cycled”. Too bad! I had high hopes for the latest release because of the lack of complaints (so far) in this forum. Maybe I’m the only one? Anybody else seeing this?
-
I have a forerunner 305 (assume it has the same chipset as the foretrex?). Anyway, the Sirf chipset in my forerunner is every bit as accurate as the mediatek chipset in my Etrex Vista HCx. I can lay down tracks with both while out geocaching, and when I overlay them later in mapsource, they rarely differ by more than 30 feet regardless of conditions. I have tried to geocache with only my forerunner, but it is a bit harder without having the map overlay handy,and I do miss the magnetic compass. It can be done in a pinch, but it would not be my first choice for a full day of geocaching. (It is kinda cool to be able to record my heart rate and calories burned while geocaching though!). My forerunner does work great on the bicycle (using the optional cadence sensor), and it is perfect for running/walking (when used with the optional foot pod). It is also my primary tool for recording workouts on my elliptical machine (added a garmin cadence sensor to the elliptical machine to record distance and pace). I can confirm that the GPS function in the forerunner unit is on par with the Garmin Etrex Vista HCx, and the Tomtom ONE XL at least in regard to accuracy.
-
RedwoodsMtn Biker & seldom sn ,,, You guys are awesome! If I had been able to find these maps a few days ago, I could have saved a lot of money (and hours of frustration!). Thanks! I checked out the GPSfiledepot forums too, and maybe now that I'm not so stressed about making maps, I'll be able to use some tips from that forum to figure it all out.