


Soxter & Billini
-
Posts
51 -
Joined
-
Last visited
Posts posted by Soxter & Billini
-
-
Thanks for the tip. I tried using Scotch-brite and it worked well enough. So I’ll leave it at that for the time being before going back to Home De-pot.

BTW, I was able to complete the 3/8” slot using a router and a wooden fixture to hold it securely. On my first try I started too fast and cracked the tube. Slow and steady works nicely. Next, the tumblers.
Hi Guys,
Something else I did when I was building my geocache cryptex was to bevel the outside edges of each combination rings. I did this because after I put it togeather with straight cut rings I found when I spun the rings they had a bit of an offset and crooked feeling because you could easily feel the edges of two rings.
We keep the rings a little loose on the base tube so they spin freely and its this subtle loosness that is easy to feel at the edges of the combination rings. This is why a bevel them. With this cut back edge it is visually appealing and feels good in the hands.
I have included a detail to show what I'm talking about. The main drawings don't show this modification but I will update later...

Hi I have a question on the beveling part of the outer rings. How were you able to do what you have in the photo? did you have a specific tool or would sanding it by hand work? Please let me know! thanks!
I used a lathe when I made mine so it was a simple task with that tool. If your doing it by hand I would recommend a deburring tool, which is available at local tool suppliy stores for about $20 or just get busy with a sanding block.
-Soxter
-
I see your hand skills are really good for something made entirely by hand.
It was hard to keep things straight using a lathe.
Great job and thanks for sharing your pic.
-Soxter

-
Edmondo-
Great work Edmondo! I have had that question a few time from other people in the world that have access to only metric pipes. Your info will help alot of people with there projects.
rocky is a very good doggie-
We sold that batch to World Caching a while ago and I believe what they have on there web site is all they have left. The smaller sizes are more popular.
Regards,
-
Please take a look at this cryptex.
http://news.deviantart.com/article/99704/#/d15lwh8
Now making one of those would be a challenge

Great link... You have my brain in high gear...
-
For those members that have been waiting and inquiring, Billini and I have been busy working on an order for World Caching <snip>
Any suggestion on how to apply durable lettering to the rings?
I would paint the cryptic cache first if you wish to make it a certain color and the apply the lettering after all is dry. A couple coats of clear coat over the letters will help seal the edges and prevent them from lifting.
-
For those members that have been waiting and inquiring, Billini and I have been busy working on an order for World Caching and we dropped them off this afternoon. Members looking to add a cryptex to one of their caches and not into building one from scratch, keep an eye on their site and they should have some up for sale soon.
They will have a range of dials from 4 dial to 10 dial. They are blank cryptic caches and ready for your imagination and personal touch to make them work for your cache. If you do purchase one please post your pics here and show others members what can be done.
Thanks to all members for their encouraging words that got us to this point.
Regards,
Soxter & Billini

-
here is the one i build . changed the plans a tiny bit for a larger pipe and parts but over all the same. only lasted 5 days and goten muggeled. gonna to a new one this weekend. now that iknow how to build them this one should be MUCH faster and easier to do.
Saw your story on another link and was sorry to here out it being muggled. It does get easier the second time around. And the 3rd...4th...5th.......
Cheers
Soxter
-
I'm currently building one as well and hopefully it's going to be the first one in the Calgary area. I modified it a little bit since I wanted the inside of the cryptex to be a bit bigger. There are several plans floating around but they seem to have a lot in common. My inside diameter is now a 1.25" pipe.
I have a question though... how do I get the screws in the inner pipe when the space for holding a screw is so tiny. If anybody who has created one could please give me some hints and tips on how to do that, I'd highly appreciate that!
What I do is cut down an hex key after the 90 degree end so I have only a 1/4" or so protruding. I then use a button head machine screw that accepts an hex key driver.
This allows you to hold the machine screw from spinning while you tighten the nut. You can reach in from both ends to get all the bolts
I have attached a 3D image to illustrate...

Cheers
Soxter
-
This is fantastic, would love to have one of these, nothing like this at all here in Japan. Happy to hear they may be available to purchase . Thanks so much for sharing your design, wish I had the tools and skills to make one myself.. Some very clever geocachers out there who can design and produce diagrams explaining it all, way over my head...
Thanks Super Naitos!
My 4 dial prototype is complete and I will see what the market is intrested in. The prototype size can have any number of dials from 2 to 10. I will have some examples for Groundspeak shortly.
Cheers
Soxter
-
These crytex's are amazing!
Any chance of any of you crafty people out there, making one For me?? I would love to use one of these.. Of course I would pay for time and materials,,,
e-mail me at adigitalparadox@gmail.com to work something out
B-rad~
Hey B-rad
I am working with Groundspeak to make a model available for purchase for the caching community. If you can be patient I hope to have something worked out in a month or so. It will be a 4 dial mini cryptex to start with and we will see where it goes from there.
There is alot of R&D that goes into making a unit that is cost effective to manufacture and keep the cost low enough to intrest the paying public to generate sales.
Stay tuned and if your looking for something custom drop me an email...
Cheers
Soxter
-
How kewl is that? That is the first cryptex I've seen with 8 characters. "GEOCACHE"?

This challenging one is on another forum page but needs to be added to this amazing list. It was released as part of the BCGA 2010 Geo-Blitz (I’ll see your 8 and raise you 10)

-
Where do I begin PatrickInChicago? Wow...Amazing...Unique... What a great job you did and I must say those endcaps just make it look unbelievable. Check out these great pics of his new Cryptex and I will leave it to him to explain.
Thanks for sharing Pat...


Cheers
Soxter
-
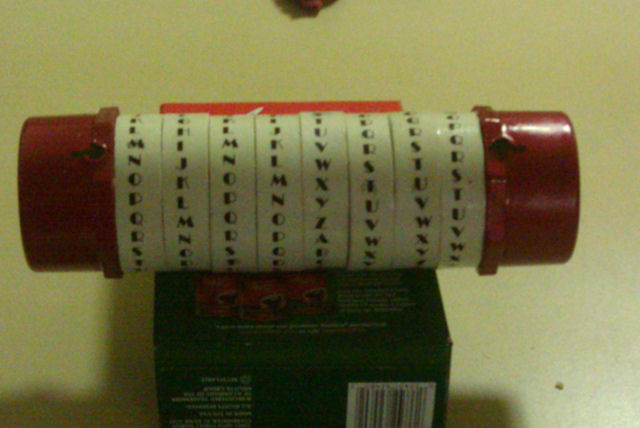
Scott (a.k.a. Papa EGTH of the Elk Grove Treasure Hunters) sent over this great shot of his new cryptices that he is using for Geo-Lexicon Series (shared, public)...

Thanks for sharing Scott! I'm pretty sure from the emails I get from everyone that this will probably get a few of you thinking about possible new cache idea's.
Cheers
Danny (Soxter)
-
Just another up date on a monster cryptex I made for Androit Seeker and a multi/puzzle series he place in Burnaby,British Columbia called B10: Gold Star - Graduation Day "Foundations" GC26Q3Z
This large cryptex was a labour of love and was built using the same design principals as the drawings you see on the forum topic just to a larger scale and with larger pvc pipe.
Here are some pictures from start to finish....


Send me some more pics of your cryptex's and I will post them here.
Cheers
Soxter
-
Here is another great look Cryptex by geo_canuck77 who built his based on the drawings in these pages. Great looking job and I love the glow in the dark paint.
In the light...

In the dark...

Thanks for sharing your neat cryptex
Soxter
-
These are the final pictures of Ligum's Cryptex after the final paint.
Vinyl lettering before paint...

Vinyl lettering removed to show base Colour...

Great Job Chris and thanks for sharing.
-
Ligum built a great cryptex using these drawings and he sent me a few pictures of his build to post for forum members. Great job Chris and thanks for sharing!


Finished pictures to follow shortly...
-
Ok....but I warned you!!! [
 ]
]Just a few mor shots of Casting Crowns finished Cryptex
Its ALIVE!!!.jpg

Detail Cryptex.jpg

Thanks Again for sharing!
-
Got a couple questions to help me clarify things:
(Before reading these, bear in mind that I'm a complete idiot when it comes to handy man stuff)
1 ) In drawing # 7, showing the key ring sections, how loose should the 1" slip into the 1 1/4"?
Mine has a lot of room between the inner wall of the 1 1/4" and the outer wall of the 1".
I'm thinking this will make it difficult to glue?
When I cut the gap in the 1" ring, should I use the wedge to expand it until it gets snug, and then glue it?
2 ) In drawing # 4, the internal key tube, can you give some more detail on how to tighten the screws? Should I punch a hole on the bottom of the tube so I can squeeze a screwdriver thru?
I see your plans call for a magnetic screwdriver, but I'm not sure what that is?
Thanx!
-Sean
Hey Sean,
Great to hear your working on your own cryptex and I will try to answer you the best I can from what I understand of your questions...
When I made my cryptex I probably had a tighter fit between my 1-1/4 piece and 1" pieces but if your fit up is a bit looser, I wouldn’t worry. Use the wedges after gluing to get a tight seal for the glue to set and to keep the rings together. If your split ring gap gets a little bit bigger, the nuts will just have a little more wiggle room when the combination is inline.
As far as you second question goes a magnetic screwdriver will only work if you’re using magnetic series stainless bolts. If they are not magnetic then use anything flat, even a tongue depressor will work. What I do is balance the machine screw on the flat surface and holding things steady feed it up inside the tube and thru the hole I'm aiming for. I will hold it there with a bit of pressure while I put the nut on finger tight. Now once the nut is past the end of the machine screw and down semi tight I grab the end of the machine screw, that is sticking up, with pliers or vise-grips and hold tight while I finish tightening the nut to the tube with a wrench.
I’m on the road this weekend but will post a few shots when I get home on Monday or Tuesday.
Cheers
Soxter
-
Ok....but I warned you!!! [
 ]
]You have nothing to warn people about! I think they look real sweet. The hardest part will be placing it in a cache after you did all that work and hope that no one steals it
Here are some pictures of Casting Crowns Cryptex and a big thanks for posting them to give other members encouragement with their builds.
If anyone else has pics please post them on this forum post or send them to me and I will get them online.
Cheers Soxter
Frankenstein (I didin't name it)...lol

BrideofFrankenstein

-
My cryptex final was released this weekend and I received great feedback from the cachers that have been doing the series. Here is the series...
Stage 1 GC237VW
Stage 2 GC23RJ8
Stage 2 GC23WYG
Stage 4 GC23WYH
Final GC23WZO
Email me a picture of the completed project and I will post it on this forum...soxter-n-billini@shaw.ca
Cheer
Soxter
WOW! Just doing the puzzles are awesome!!! Sure you don't wanna move down here to Fort Worth, Texas?
No thanks but we do love the State of Texas and have a friend who lives in Marble Falls. Now that we have started geocaching I will look forward to caching in other parts of the world.
Cheers
Soxter
-
Well, Soxter & Bellinni, I made my cryptex using your drawings.....it's a hideous beast but it works! HAHAHAHA! I definitely learned some things while making it and will figure how to make my cuts more accurately such as yours.
What was the most tedious part of it all? Sanding that freaking 3/4" pipe down to fit inside the 1" pipe.
Biggest trial and error? Getting the holes spaced correctly with the (now obviously) crooked cuts that I made. HAHAHAHA!
I was going to have the same number of dials that you have but decided to go with 5 on this one. I now know what to do to speed along the process for my next one. Thank you again for the detailed prints! They were so good, in fact, they convinced me that this would be a two hour project at most. I'm afraid to think of how many I actually put into it......make that embarrassed. HAHAHA!
No worries CC! As with any new project your time would improve with each new version. I checked my time on the drawings alone and it was over 7 hours. I was building the cryptex at the same time and was going back and forth from drawing and building so my time on the cryptex was probably in the 6 to 8 hour range also. When it is a labour of love and your boss isn't breathing down your neck you'll always put in the little extra you need to make it happen.
My cryptex final was released this weekend and I received great feedback from the cachers that have been doing the series. Here is the series...
Stage 1 GC237VW
Stage 2 GC23RJ8
Stage 2 GC23WYG
Stage 4 GC23WYH
Final GC23WZO
Email me a picture of the completed project and I will post it on this forum...soxter-n-billini@shaw.ca
Cheer
Soxter
-
just search "find another player" for his user name and you will get it. I am sending him and email to let him know we used his stuff.
I gave him a heads up before I posted also
-
Anyone want to take a stab at creating one with large enough dimensions to hold swag?
I sent the pictures of Watchdog2020's to the original poster and he wil post them. The cache container is 2" interior diameter and about a foot long. It could be made any length. Deployed today in GC24XQC which is pending approval.
Here are his orignal piictures seen in an earlier post.


I had seen these in an earlier link but cannot find it. If anyone has a link to the post please add it here...
These original drawings were part of my inspiration to build my current cryptex and drawing and I would like to thank Watchdog for his work.


 ]
] ]
]
Cryptex Drawings for Geocaching Community
in General geocaching topics
Posted
Thanks Papa EGTH. I do not have the website hosting anymore...